Today we will be installing Lidarr docker on a Raspberry Pi 4 and configuring it to work with NZBGet and Usenet. This is episode 18 in our Raspberry Pi series. If you have not followed our previous episodes we recommend you do so before attempting to follow any of our episodes. Each tutorial follows on from a custom setup and you may miss some prerequisites.
Having said that we will list out the prerequisites below. so you can attempt to complete today’s tutorial without watching our previous episodes.
Difficulty=Easy
Table of Contents
Copyright Disclaimer:
We do not condone piracy in any shape or form. We provide information for educational purposes. We are including Lidarr in our Raspberry Pi series as it shows off how well the Raspberry Pi can integrate via API to other applications to automate tasks and organize data. Please respect the law regarding copyright in your country.
Prerequisites:
- A Raspberry Pi with Raspberry Pi OS installed. We recommend using an SSD for Lidarr.
- Secured Raspberry Pi.
- Openmediavault, Docker and Portainer Installed.
- A volume created in Openmediavault to be used for the Lidarr container storage (Appdata folder).
- A Downloads folder stored on an external USB drive so you can store large media files.
- A Usenet provider – We recommend Newshosting You will need all your account details at hand.
- NZBGet Installed and configured to work with a Usenet provider. Check out our guide here.
- Access to a Usenet Indexer. NZBGeek is currently open for registrations. (Use at your own risk).
Recommended USB Hard Drives For Raspberry Pi:
| WD 1TB My Passport Portable External Hard Drive | WD 4 TB My Passport Portable External Hard Drive |
| USA Amazon Link: | USA Amazon Link: |
| UK Amazon Link: | UK Amazon Link: |
What is Lidarr?.
Lidarr is a Music collection indexer that can monitor, organize, restructure and update a Music collection based on Artist and Album data. It works with NZBget and Usenet and supports full automation downloads from private Usenet servers.

Lidarr also supports Torrents. We won’t be covering them today but it is possible to integrate your trackers and download clients into the Lidarr interface.
How to install Lidarr Docker on Raspberry Pi 4.
Step 1 – Create the folders needed for the Lidarr Docker container.
Open up a terminal or Putty application.
Connect to your Raspberry Pi via SSH (secure shell).
ssh -p PORT USERNAME@YOURRASPBERRYPIIP
Navigate to your “Appdata” folder or the place where you store all your containers persistent configuration data.
cd /srv/YOURUSBDISKUUID/Appdata
Create a folder called “lidarr“.
mkdir lidarr
Navigate into the “lidarr” folder.
cd lidarr
Create the “config” folder where all the lidarr configuration data will reside.
mkdir config
Now navigate into the “config” folder.
cd config
From here you will need to get your “absolute path” for your “config” folder.
pwd
Copy the output of the pwd command and paste it into a text file. You will need this in Step 2.
The next folder that is needed is a “downloads” folder. If you have followed our previous episodes you should already have this folder set up. If not create one and make sure it resided on an external USB drive with enough storage capacity to fit your download needs.
The Downloads folder is used for Lidarr to process the raw data it gets from Usenet. It will unpack, verify, repair, rename the data here before moving it to your “music” folder which you will create below. Once it moves the data it will delete the files automatically from the root folders of the “downloads” folder freeing up space.
Now navigate into the “downloads” folder and you will need to get the absolute path.
pwd
Copy the output of the pwd command and paste it into a text file. You will need this in Step 2.
The final folder you will need is the “music” folder. This is the final resting place for all music files downloaded and processed by Lidarr.
We will place this folder within our “downloads” folder to keep it simple. While still in the downloads folder.
Create a “music” folder.
mkdir music
Navigate into the “music“.
cd music
To get the absolute path.
pwd
Copy the output of the pwd command and paste it into a text file. You will need this in Step 2.
Step 2 – Create the Lidarr Container Using Portainer and a Stack.
Navigate to your Portainer dashboard and log in.

From the left hand menu click on “Stacks“.

Now in the Stacks dashboard click on “Add a stack“.
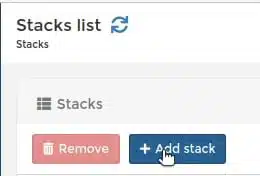
In the “Name” field enter “lidarr“
Now Copy and paste the following docker-compose data into the “Web editor” field. Be sure to change all the file paths to the absolute paths you saved to a text file in the previous step.
You will also need to change the “TZ“, “PUID” and “PGID” fields to match your setup. You can find these by following our video guide above.
Lidarr Docker Compose Stack
---
version: "2.1"
services:
  lidarr:
    image: ghcr.io/linuxserver/lidarr
    container_name: lidarr
    environment:
      - PUID=1001
      - PGID=100
      - TZ=Europe/London
    volumes:
      - /PATH/TO/FOLDER/Appdata/lidarr/config:/config
      - /PATH/TO/FOLDER/Downloads/media/music:/music
      - /PATH/TO/FOLDER/Downloads:/downloads
    ports:
      - 8686:8686
    restart: unless-stopped
Once you have completed that you are ready to click “Deploy the stack“.

If you navigate to “Containers” in the left menu

You should now see your “lidarr” container in the list.

Give the container a few minutes to fully start up then you can connect to the Lidarr dashboard.
http://YOURRASPBERRYPIIP:8686

You should now be ready to configure Lidarr.
If you would like to know how to configure Lidarr to work with NZBGet. Please follow our Youtube video for this episode.
We need your support.
We hope you enjoyed this episode and that it was helpful and you got benefit out of it.
If you did, please consider supporting our channel by Subscribing to our YouTube channel, and liking and sharing our content.
You can also make a donation via Paypal or become a Patreon if you wish to do so.
You can also follow us on Facebook or Twitter.
If you have any questions or any requests please ask in the comments below or on YouTube.


0 Comments